Wednesday, March 30, 2011

Easy Lego Party Crafts

Wanted to share some easy Lego craft ideas from  Jackson's Lego Birthday Party.

These Printable LEGO Soap Tags  are now available in MY SHOP!


Since time was not on my side when planning for this party, I decided not to make the Lego Man soaps myself and instead ordered some from Broken Road Farm HERE. But if you want to make them yourself, you can find detailed instructions at Roots and Wings. And don't forget, you can save time and buy pre-made Lego molds here. I used the time I saved to design the dry-witted packaging that went over the heads of my target audience. But I digress.

These LEGOMAN 4x6 Printable Pictures are now available in MY SHOP!

I made these Lego frames while sitting in front of the TV one night hot gluing real Legos onto wooden frames from the craft store. My idea was to take a picture of each party goer and their lego creation and put it in the frame to give them at the end of the party. But the kids liked the Lego men I put in the frames so much, I didn't bother and just gave them the frames as-is. The kids really liked being able to put their Lego men on top of the frames. They were a hit!

Here's where you can find all of my Lego Builders Birthday Party details:
  1. Lego Builders Birthday Party Invite here 
  2. Lego Builders Birthday Party here
  3. Easy Prep Lego Food "How To's"  here.


If you're looking for more crafty Lego ideas, try some of these:

Hope these ideas might inspire you to plan a Lego Party for your kids! So fun!


Tuesday, March 29, 2011

Easy Prep Lego Party Food "How to"

These tasty treats are super easy to make and created a big WOW factor with the kids. Totally worth it! Be sure to check out my son's LEGO BUILDERS BIRTHDAY PARTY HERE. 

Mix food coloring into the icing and ice the Little Debbie treats. Stick the treats in the fridge for about 30 minutes. Then top with M&M's. Delish!

I used a Fondant circle cutter to make the cheese circles. Then dabbed a teensy bit of cheese wiz in six spots on each cracker and placed the cheese circles on top! Yummy!

I used the same Fondant cutter to cut out little pepperonis and placed them on frozen cheese pizza.

I melted the chocolate chips (enough to fill one tray of molds at a time) in the Microwave for 40 seconds at a time on 50% power until the chocolate melted. Take it from me, DO NOT over cook the chocolate. It will burn! I lightly misted some Pam in the molds, then scooped the chocolate in with a spoon. You have to work fast before the chocolate hardens. Since I only had two molds, I put them in the freezer to harden so I could work faster. The chocolates pop right out of the mold in about 10 minutes. Store them in the fridge until party time:)

OTHER LEGO FOOD IDEAS:
  1. Lego Gummies— One other treat I didn't have time to prepare was Lego Gummies. Go HERE for complete instructions. This guy actually teaches you how to make your own sylicone Lego mold, if you have some extra time on your hands. Or you can just order some Lego molds HERE.
  2. Lego Hard Candies— Get them here.
  3. Lego Candles— Available here.
Here's where you can find all of my Lego Builders Birthday Party details:
  1. Lego Builders Birthday Party Invite here 
  2. Lego Builders Birthday Party here
  3. Easy Lego Crafts  here


Monday, March 28, 2011

Jackson's LEGO Builders Birthday Party!

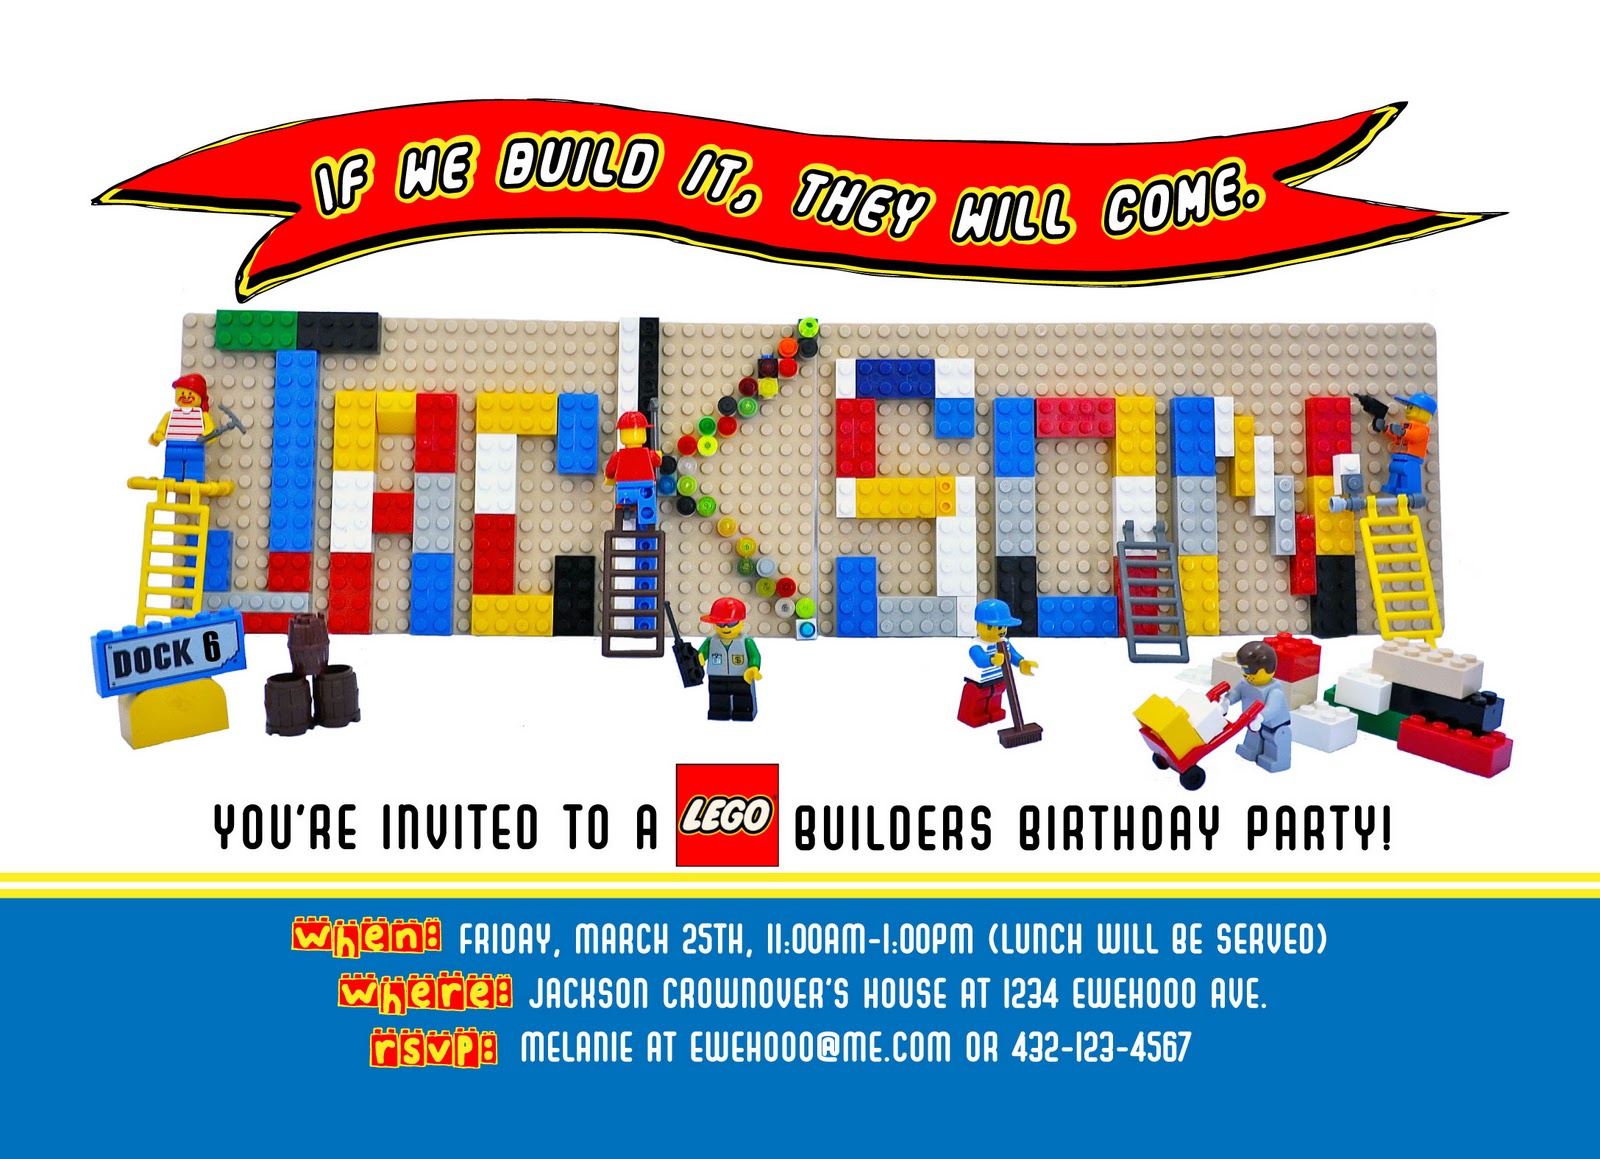
There was no school last Friday, so we planned Jackson's Lego party for that day to kick-off our Spring Break! If you didn't see the Lego Party invites I sneak previewed last week, have a look here. Later this week I will also post some "how-to's" for some of the Lego crafts I did for this party. Enjoy!

THIS LEGO PRINTABLE KIT IS NOW AVAILABLE IN MY SHOP!


I made these Lego frames by hot gluing real Legos onto wooden frames from the craft store. My idea was to take a picture of each party goer and their lego creation and put it in the frame to give them at the end of the party. But the kids liked the Lego men I put in the frames so much, I didn't bother and just gave them the frames as-is. The kids really liked being able to put their Lego men on top of the frames. They were a hit!

I went to the Party store and bought the cheapest piñata I could find that was shaped like a box. Then I added red streamers and four Solo Cup tops to make a Lego piñata. Then I strung it up on our trampoline and let each boy come up one at a time and take a couple of swings at it.
I picked up these cute Lego Loot Buckets from the Party store too and added name tags so they wouldn't fight over who got which color. They got to scoop up as many Legos as they could from our Lego stash, plus the candy from the piñata and a few other goodies like the Lego man Soaps below and Lego man Flashlight Key Chains. Everyone's buckets were filled to the rims when the left.

Everyone wanted to take home our coveted Lego men and I did not want to disappoint, since we have enough for a small country. So I put one Lego guy for each guest in little bead jars from the craft store and called them "Lego Freeze Chambers". This got lots of wide eyed oooooo's and ahhhhhhhhhhhhs from the group. They couldn't wait to pick out their very own Lego Freeze Chamber!

The Grand Finale was blowing out the candles on the yummy Lego Cakes. We actually had to light the candles twice because the kids were so excited the first time around they all blew out the all candles while Jackson still had his eyes closed making a wish. 
I think everybody went home happy.
Happy 6th Birthday Little Man! I love ya!

Thursday, March 24, 2011

Lego Birthday Party Sneak Peek...

 Yes, Jackson's 6th birthday was a few weeks ago, but we've been celebrating all month! And now we're counting down to his Lego Birthday Party— which is, coincidentally, on the same day as his big brother's birthday. Wesley was fine with sharing his birthday with his little brother as long as he gets presents too. Deal!

Well, here's the invite I sent out. Jackson and I spent one Saturday afternoon building his name and finding all the lego men in our Lego stash. This is just a sneak peek into some of the fun we have planned. So stay tuned!
(FRONT OF INVITE)

(BACK OF INVITE)
"If we build it, they will come."
5"x7" Double-sided Invite
Fonts used: Lego Thick, Lego Blocks and Hamburger Menu Marquee

Wednesday, March 16, 2011

Happy St. Patrick's Day!

My kids' (half) Irish eyes are smiling because we're celebrating our (50%) Irish heritage in green style!


FREE Download HERE and HERE! Compliments of ewehooo!

It's back and it's got shamrocks on it this time! My versatile bunting is really coming in handy!

 Thanks to my super talented and imaginative friend Jeromina over at Paper Plate and Plane, I made these adorable Lucky Leprechaun hats for Wesley's class. They're sure to be a hit! Click HERE for her detailed instructions.


THE LUCKY DETAILS: 

  • Lucky Cupcake Party Circles— I designed the St. Patrick's Day Party Circle cupcake toppers and you can download them FREE  HERE.
  • Lucky Cupcake Wrappers— I also designed the St. Patrick's Day Party cupcake wrappers and you can download them FREE  HERE.
  • Versatile Shamrock Bunting— It's back with felt shamrocks this time. Go to my previous post HERE for complete instructions. 
  • Lucky Leprechaun Hats— Go to my friend Jeromina's blog for complete instructions HERE.
  • Lucky Yarn Wreath— See my previous post for complete instructions HERE.
Thanks for stopping by! Hope you have a happy St. Patrick's Day!

Iron Craft Challenge #11— Make Something Green (Literally)

This week on IRON CRAFT The challenge was to make something green. Not green as in the saving the earth kind (I'm sure that will come in April for Earth Day), but the actual color GREEN.

Well, you know how I love yarn wreaths! And this one is just in time for St. Patrick's Day! I'm part Irish and part...I dunno, something else, so in the spirit of celebrating (a portion of) my family heritage, we are doing up St. Patrick's Day in a pretty big way this year— starting with my "Lucky" wreath.

This was so easy to make. All I needed was a wreath form, some yarn (of which I have gobs), some straight pins to secure the yarn on the wreath, coated copper wire from the hardware store  for the lettering and some hot glue to secure the yarn on the lettering. Love it!!

I'll post the rest of our St. Patrick's Day treats later today.

Am I feeling lucky? Yes, actually. I am. I better go buy some lottery tickets before this feeling goes away.

Hope you have a lucky day!

Monday, March 14, 2011

When we learn we grow! — Fun with Flowers at School.

 
I decided a few years back that if I'm going to volunteer at my kids' school, I better do something I enjoy! I've been decorating the Cafeteria bulletin board for about two years now. This month I had some fun with flowers for Spring. I was inspired by the current display at Anthro. Love them!!!
Since I was on a budget (the budget being $0), and keeping in mind a younger audience I kept my flowers simple, colorful and inexpensive to create. I just used the school's banner paper and sketched a bunch of flower petals, cut them out and taped floral wire to the back of each petal to create the 3D flowers. The flower centers are just bright colored felt glued onto paper plates and stuffed with a little batting. The flower stems are sticks. Then I just hot glued everything to the board and shaped the flowers.
Viola! Spring time at lunch time for all the students!


Thursday, March 10, 2011

If I could wish a wish...

At the heels of Dr. Seuss's birthday last week, I've been thinking in rhymes ever since. And I can't get this particular one out of my mind!


So we went ahead and celebrated.


Why do they have to get older? Oh well, maybe if I keep on wishing the same wish on my wish dish, it will eventually come true! Or is that just when I get grandchildren?

Friday, March 4, 2011

A "ewe"nique Photostrip Collection.

I'd like you to meet Erin Vertolli— my very talented friend and fellow Blankner Mom. She is probably the coolest Mom I know. For one, her kids are named London and Vegas. How cool is that? Her house is very West Elm meets CB2 with a dash of IKEA. Plus, she is the talent behind One Lucky Baby— a line of hip baby attire and accessories designed with the modern Mom in mind.

Erin invited me over recently to pour though her fabric scraps. I love using fabrics in my mixed media art. Anyway, when I walked in the door, I saw this collage of Photo booth pictures on her wall. I absolutely loved it and asked her about it. This was her response: 

ERIN: I have this ridiculous obsession with photo booths. Not the digital, or the sticker booths but the old school classic B&W or Color booths. You get 4 shots. No retakes. No copies. I started collecting strips about 15 years ago. Most pictures are of friends and family but I've got fantastic photos of strangers too. Am I surprised when I ask random people if they'll squeeze their body into 2x2 feet, take some pics and let me keep them? Always. Not sure if it's the booth or the booze, but people lose their inhibition in these things.

Only a few places in Orlando still have the classic booths including Eye Spy, BBQ Bar and Stardust. And maybe one day, my living room. Until then, I'll keep collecting, framing and dreaming of my own!"

Be sure and check out Erin's shop here:

Well, I think I'm going to round up the hub and kids and go find a Photobooth! Have a great weekend!

Wednesday, March 2, 2011

A Garden Birthday Party - for Mackenzie!

INTRODUCING: The Garden Party Collection available now on Etsy! 
To see the full collection click HERE .

MY NIECE RECENTLY TURNED FOUR and we celebrated with a Garden Birthday Party designed and illustrated by yours truly! Here's the double-sided invitation that was sent out to friends and family (see above and below).

And here's the Birthday Girl!
Since my house is full of boys, I had so much fun designing this party for Mackenzie. 
  • The tablecloth is made from colorful bandanas. Thanks Mom for sewing it together for me! 
  • Hot Pink Water Jug— is from Joann's found with all their Easter stuff.  Same with the flowers. 


  • The yummy homemade white cake was layered with fresh strawberries and homemade icing!
  • I made clay cake toppers to match the Garden themed invitation. (Thinking about selling these too.)
  • The little statue of Mackenzie was made using Shrinky Dinks! That was fun to watch it bake!
  • My friends Shona, Claire and I sewed the Mini-bunting for the cake (and also for the yarn wreath).


  • I spray painted the clay pots in bright colors and filled them with Jelly Bellies.
  • The Flowers were made from a template and tongue depressors (template available at my shop)
  • The Party Circles in the center of the flowers are part of my Garden Party Collection.


The kids loved playing and planting flowers in the sandbox.

  • Chenille bubble blowers were easier for the kids to dip into the bubbles and the chenille absorbs the bubble mixture and makes bigger bubbles!
  • The Bubble Wrappers are part of the Garden Party Collection.

 I found this adorable Butterfly Catcher jar with "what looked like" a real butterfly! Tap on the top of the jat and the butterfly flutters around. It was a big hit with the kids.


 Click here for instructions on how to make these cute balloon flowers!

Guests left with these Garden Party Favors.

 Can't wait 'til next year!

LinkWithin

Related Posts with Thumbnails