Pages

Sunday, January 30, 2011

Warrior Dash 2011— Crazy Fun!


THE WARRIOR DASH 2011, Lake Wales, FL— Hands down, the funnest race I've ever run! There was mud and lots of it. The thick, black slimy kind. And the cold, murky, up to your waist, can't see what you're stepping in kind. I crawled under barbed wire and jumped over fire. I AM WARRIOR MOM! HEAR ME ROAR!


NEXT FLORIDA WARRIOR DASH— January 28-29, 2012
I'll be there! Will you?

Burlap Pinboard— for old family pictures

Since my grandmother turned 93 last October, she's been on a mission to de-clutter her surroundings.  Her most recent project has been to take one last look at all her photos (and she has a ton) and then give them away to anyone who wants them. I LOVE old photos so I snagged as many as I could before my sisters could have a chance! Someday I want to do something spectacular with them, but for now, I decided to display them. So yesterday afternoon I made this burlap pinboard for above my computer. Similar pinboards retail for $100 bucks, but I made this one for under $15. And it was so easy!


 You'll need:

  1. A piece of cork (from a home improvement store)
  2. Burlap (1 yard) 
  3. Twine
  4. Beading Pins (14-7/8" nickel plated steel with large heads worked well for me)
  5. Staple gun
  6. Hammer
  7. Picture Hanger for the back (optional)

How to:

  1. First cut your cork board. I had a big piece so I cut it to the size I wanted (24"x36") with a utility knife. But you can have it cut to size at the home improvement store (free). 
  2. Wrap the burlap around the cork, pull it taut and staple it to the back. 
  3. Place pins in columns every 4 inches apart and hammer them in so that only 1/4" shows. Tie a knot at one end of your twine and secure it to the pin at one corner of your board. Then wrap the the twine tightly around each pin pulling it up and down each column. Once the columns are finished, back track across to make 4" squares. At the end, secure the twine with a pin and hammer it all the way in.
  4. It's ready for hanging! I just leaned mine on a shelf, but you can easily add a picture hanger to the back.

And now for my pictures... 
My grandmother married Arthur Jackson "Bud" Morris just before WWII started. He only saw his daughter once while on a short leave. Bud was Killed In Action just before the war ended. Devastated, my grandmother decided to move to Florida from her hometown in Indiana because that's where her husband always said he wanted to live. Everyone, especially her older sister Evelyn, thought she was crazy, but my grandmother didn't care. She packed up her car and drove my mom (6 months old at the time) and her mother (Reba) to Florida. They decided to settle in Daytona Beach on the advice of a gas station attendant. Uncle Ray, my great grandmother's brother, came down to check on them soon after and then went on to visit his was good friends, the Rockefellers, who had a summer residence in nearby Ormond Beach. Then on to Miami to visit the Hoovers. (I'm name dropping here.) Their first home wasn't far from the beach, which they frequented often.
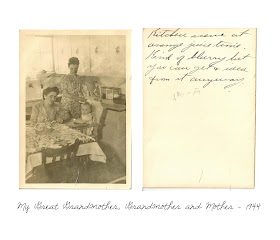
In October of 1944, my grandmother met C. Wesley Olson, Jr. "Wes" one night at a bar— or a dance hall, as my grandmother calls it. You know how they always say, you'll never meet your significant other in a bar? Well I don't believe that for a second. Heck, that's where I met my husband! Anyway, she walked by him at the bar and he looked at her and said, "I always did love red!". She was wearing a red dress and dashed to the bathroom with her girlfriends who wanted to switch dresses with her because the man was such a dream boat. They were smitten with each other from the start. WIthin three weeks they were engaged. Wes came home from the University of Florida to visit her every weekend and in January 1945, they were married. He adored my mom and adopted her and they had a son, Steve. They were happily married for 56 years.


 And there you have it! One courageous (and somewhat rash) decision changed the course of history for my family. And I'm so thankful for it!


P.S. Both of my sons are named after their great grandfathers— Wesley and Jackson.


Thursday, January 27, 2011

"Love in a Cup." - Illustration & Coffee Wrap

THIS WEEK ON IronCraft: Challenge #4 "Get Cozy"— The challenge was to make a coffee cup cozy. 


Well, I don't knit or crochet, so I had to come up with something else. I do love my coffee (as I explained in my previous post) so I put my love for my cup of Jo into words and came up with the illustration. Then I realized it wasn't legible when reduced to the 2.5"H coffee cozy size, so I simplified my design. Me likey!


Do you love your morning coffee too? 

If so, you can get your very own custom "Love in a Cup" illustration and coffee wrap over at my etsy shop! It's a great gift! 
Click here to get yours!


Love in a Cup.

8.5"x11" Illustration
"Love in a Cup"

I never thought in a million years I'd start drinking the brown stuff. But it happened. I turned 40 and started getting up at outrageously early hours to train for a marathon. Coffee got me through the first few miles. Now, two years later, I've perfected my recipe for the perfect cup of Jo and I'm completely hooked.

I used a list of "My Favorite Things" from my Blog Profile to create this illustration because my morning coffee is all of these things in one scrumptious little cup.

Mmmmmm. Can't wait 'til morning!

Tuesday, January 25, 2011

Soapy Snow!

I kind of feel bad for all the Northerners having to brave the massive snow storms over the last couple of days. And from what I've heard, there's more to come! Down here in sunny Florida it's a breezy 75 degrees and I just went for a run. I can't imagine having to layer up! 


Well, even if you don't live in Florida, there's no need to bundle up to play with this snow! Last weekend  the kids and I made fake snow, or "clear mud", as my friend Lucy calls it over at Craftberry Bush. Click here for her complete how-to directions. Basically this snow is made of ripped up toilet paper, shredded ivory soap and some water. Mix it all up and you've got some clean smelling snow!


Monday, January 24, 2011

A Sneak Peek at my New Party Collection— Movie Night!

One of my customers recently asked if I would design a movie night party invitation for her son's upcoming birthday, so I took on the challenge and came up with a few options for her. This new design is along the same lines as my Mad Science Party Collection— tongue and cheek humor featuring a custom photo of the birthday boy and his pet be it a dog, cat, hamster, sibling, what-have-you. It's all good.

Thought I'd give you all a sneak peek of my work-in-progress. Oh, and if you have a daughter, not to worry! I'm also working on a girl's version of this invite.

Which version do you like best? Here's a closer look:


Ok, truth be told... this one (TNT) is my fave. It's a little Roadrunner-esque with the whole TNT thing. And, for me at least, it epitomizes the unconditional obedience and loyalty of man's best friend—literally.  


 I'll be offering all the other fun accessories too like admission tickets, treat bags, a banner, party circles, cupcake wrappers, the works. Stay tuned!

Thursday, January 20, 2011

Versatile Bunting

I'm so excited! I joined Iron Craft's "Year of Crafty Challenges". Every week in 2011 a new craft challenge is posted on Iron Craft. This week's challenge (my first) was to "Just Bunt"— create our own bunting.
What's bunting? Well, "bunting" is basically any festive decorations made of fabric, or of plasticpaper or even cardboard in imitation of fabric. It typically is made of strings of colorful triangular flags and fabric gathered and draped into swags or pleated into fan shapes. And there are some really crafty people out there making some imaginative bunting! Check out my friend Jeromina's edible bunting! Or Chrissy's magnetic bunting. Very cool!
I came up with a simple idea that can be used over and over again...
I kept the actual bunting clean and simple using neutral cotton and linen fabrics. These flags are super easy to make. I am not a sewer, but I was able to finally thread the needle on my sewing machine and sew the flags myself! Woohoo! Then I added a pop of color with the Valentine's themed patches I hand stitched and velcro'd onto the flags. Completely removable and re-"ewe"-sable! How convenient is that!
I'll be using this for all our holiday decorating this year. Next up— Shamrocks!

Be sure and check out the other great bunting ideas at Iron Craft.


Friday, January 7, 2011

My Mixed Media Gallery— 2010

"The White's House"
11"x14 mixed-media acrylic on stretch canvas
(Commission)


"A Mountain Retreat"
12"x12" mixed-media acrylic on stretch canvas
(Commission)


"Something for over the couch"
40"x40" acrylic on stretch canvas
(Commission)


"Tweeting in the Rain"
4"x12" acrylic on stretch canvas


"Oh the places we've lived"
3 in a Series of 7
mixed-media acrylic on wood
(Gift)


"Red Robin"
12"x12" mixed-media acrylic on stretch canvas


"Fly Away Home"
9"x12" acrylic on stretch canvas
(In Loving Memory of Matthew Eric Dunn)


"Garden with a view"
11"x14" mixed-media acrylic on stretch canvas


"Knockout Roses"
11"x14" mixed media acrylic on stretch canvas


"Max and Birdie"
sketch colored with pastel and ink


"Blankner School" 
9"x12" beeswax collage


"Beeswax Bird"
4"x7" beeswax collage


"English Tudor"
12"x12" mixed-media acrylic on stretch canvas


"Humming Bird"
9"x12" mixed-media acrylic on canvas board


"Try something new"
12"x12" mixed-media on stretch canvas


"Daisies"
12"x12" acrylic on stretch canvas


"Bird Meeting"
12"x12" acrylic on stretch canvas


"Willow tree"
9"x12" mixed-media acrylic on canvas board